Monday, December 31, 2018

Please Excuse My Tears

    Please excuse my tears. I cannot see very well right now so if I type something wrong, I cannot help it. I have lost my best friend.
    You have all seen my avatar, the little dog. That is Sandy. I found her one morning running in the middle of the road. I picked her up and took her home, then went to work. That evening the wife and I canvassed the neighborhood to see who lost her, but no one knew anything about her for blocks around. One lady, across from where I found her, said that people drop animals around there because across the street is a swamp. I kept her. Sweetest little dog I ever had.
    At her last visit to the vet in August I was told she had an enlarged heart and that it was so big her lungs could not get enough air. We put her on medications. The prognosis was 6 months to a year. 
    When I got home today, I got down with her and petted her and talked to her, then went into my office for a few minutes. She came in and I got down with her again for a bit. She got up and went to the living room, then crawled into her bed. She had waited for me to get home from work to say goodbye.
    She died today at 6 1/2 years old. Too young. Pardon me, I need a handkerchief.

Tuesday, December 18, 2018

Well, The Colors Are Different

    If you look at Craftree you will find that I am working on a doily that was the 2015 Mystery Tat-Along. I want to show you this now because of the thread color. I am tatting this in King Tut, #941, Old Giza. I was not sure how it would come out, but the colors are interesting, to say the least. It is a very busy blend. Since King Tut is a quilting thread, I can see where this would have applications quilting over some busy print fabrics. In this photo I am about 2/3 the way finished and the doily is about 3"3/4 across.

    The challenge I set for myself for this one is to do it in continuous tatting. So far, so good.

Saturday, December 15, 2018

I Couldn't Resist

    A couple of posts ago you saw that finally my back yard mess is gone. Nothing left that I didn't want. Well, almost. Anyway, the bare lands between my back neighbor and me finally got to me. I had to do it. I shouldn't have, maybe, kind of, but I did. I had a new shed built. And this one is bigger.

 
    I have, for a long time, wanted a workshop. A place to store and organized my tools and equipment, and a place where I can work on things. For instance, I really need to sharpen the mower blades. I just don't have a convenient place to do it. Now I will. The shed is up and done.
    Next, I have build steps. That should not take long, maybe tomorrow. Then I can move what is just thrown into the other storage shed into this one. The other one mostly has the wife's stuff in it. I have to go around her stuff to get to mine.
Once I get that done, it will be time to run electricity, then insulate, then build workbenches, storage cabinets, etc. It will take some time, but worth it in the long run.
    I am seriously considering making a smaller room inside for my recliner and my tatting. We shall see.

Thursday, November 29, 2018

One More Hat

    Yes, I have been wearing my hat. It is getting more like winter now. Not too bad, about 50F daytime, but the last couple mornings have been just below freezing. Now I am glad I made the hat.
    One of the fellows I work with saw my hat. I had made him one a few years ago, but a different style. It had no cables and was just ribbed all the way up. He asked if I could make him one like this, so I did. This one is made in Caron yarn. It is a pretty soft yarn. He likes it.
    I did ask him where the other hat is. He said his mother liked it so well she took it and that's why he needed another!
    Now, back to tatting.

Tuesday, November 13, 2018

My Hat

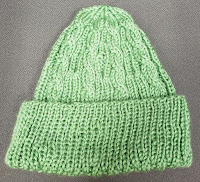
    I have a favorite TV show. It is a British comedy by the title "Last of the Summer Wine. It is about 3 older men, retired, no wife any longer for whatever reason, and their second childhood antics. I think is it the best comedy I have ever seen. (I know others have their own opinion.) There is one character they call Compo. In the show he wears a knit cap. I checked around online and found a pretty close pattern. This one is my first try. I do have a few mistakes, but if it gets cold, I don't think I will care.
    At least it is in my favorite color - green.

Sunday, November 11, 2018

Finally! No More Mess!

    This one is not about tatting. You may remember that 2 years ago Hurricane Matthew decided to pay a visit to this area. The wind was not so bad, about 75-80 miles per hour at the most. The bad part was it dumped 14"+ rain. What happened then was trees could not hold on because the ground was so wet. They may as well be planted in sand. Combined with the wind, the rain made it so they just fell over. The worst one for me was an oak in the back yard. It was 75-100 feet high and 40" thick. It has taken me 2 years to get it cleaned up, but finally it is done. Here are just a few pictures of the progression. The dumpster holds 20 cubic yards of material. I loaded 3 of them.


    It took so long because I am not longer the perfect physical specimen I used to be. (Yeah. Right.) One thing for sure. Getting old sucks. Now if I can just get some grass planted next spring.

Saturday, November 10, 2018

Finished With a Christmas Present

    Once again, it's been a while. Just getting busy with life. The wife is not feeling well so I have been trying to take care of her, as I can. I am still working too much and playing - well, not enough. But such is the way of the world.
    On a positive note, I finally have finished a Christmas present. This one is Renulek's Spring Napkin 2018. This has really been an interesting tat. Mostly I have had to do it at work, no, not on company time, but I usually arrive about an hour ahead and have coffee and quiet. I also take lunch in my office so I eat, then tat. I started this one in February. Between everything else, I finally got it done yesterday.
    I did the first several rounds as continuous tatting, but eventually the pattern got a bit complicated so I had to start individual rounds. On the last round are 48 "points". I used the method I have in my Experiments page for doubled rings. I think it looks better that way. In this photo I have not blocked it yet. I have washed it with Orvus though. It is tatted with Pop-A-Bobbin shuttles using DMC100 and measures about 13" across. I wonder what it would be in size 20?

    This doily will go to my niece for Christmas.

Sunday, September 30, 2018

Splitting the Self Closing Mock RIng

    Sometimes things just turn out easy. Not often enough, for sure. I am working on a design and got to a place that I needed to throw a ring from a ring. The easy answer is the SCMR (Self Closing Mock Ring.) The problem was, I also needed to exit from a location other than where I started, which usually means a split ring. So, can I combine the two?

    I searched online for this to see if I could do it. Better than having to undo a bunch of stitches, right? All I could find was how to make an SCMR. No mention of splitting at all. That did it. Now I have to try. And it was SOOOO easy. I posted the video in the experiments page I have here. All it really entails is make the scmr as usual for the first side, so I needed to do (5 TR 5-5/5). I made the first part then closed the scmr. This pulls the loop out of the way. Now just pull the core thread back a little, RW and make a split chain using Marie Smith's method. Not a problem in the world now. On with the rest of the design.

Saturday, September 29, 2018

Papa's Got a Brand New Bag.

     A couple of years ago I won a wonderful tatting bag at Tat Days. I have carried it to work and everywhere else for the last couple of years and I need to wash it. I decided to get another one instead. Ok, I am going to wash the older one. I will probably use them both. But you have to see the new one. The material is just beautiful.


     The bag is from a material that has an autumn feel to it. The leaves look great on the yellow background. I always did like earth tones. Inside it is double lined in yellow. Wow, I can see what is there now, it is so light and bright. The bottom has a CD sewn in for a stable, flat bottom. The cord goes through metal grommets. This bag is just so well made.
    Now, if you want one of these, first of all, they do not cost what a Dooney and Burke purse costs. (Wife has those.) These are only $22. You can get them from DS9 Designs, by Debbie Arnold. I ordered mine on  Wednesday morning and it was in the mail on Friday so she does really fast shipping. I think the shipping is a flat rate, about $7.99. She does make beautiful bags.

Saturday, September 22, 2018

A Smaller Teapot

    Challenge met. I used that center to make the smaller teapot. It actually went quite well. I wanted brown tea, white steam and a silver pot and that is how it came out. Tatting with the King Tut thread is no harder than tatting with larger sizes except if you have to undo a knot. Then I will sometimes use a magnifier to help me see how it is twisted. Doing the actual tatting is the same motion and feel though.
    I did a second photo so you can see the size difference in the outcome of how much smaller the King Tut tats up.

Thursday, September 20, 2018

A Challenge

    So, now for a challenge. I like challenges. They keep you sharp and test you in ability, patience, tenacity and other ways. This one is going to be a little bit of a challenge. If you look at the photo it should be familiar. If not, scroll down a couple of posts. This will be another broomstick teapot. I had an idea at Tat Days. Since I did the little turtle in King Tut thread, why not the teapot? So now I have the center done. Like the colors? There is brown tea and white-ish steam in the pot. My pot (the rest of the pattern) will be silver, of course. I like silver. I even have some sterling shuttles. I don't think the rest will be as much challenge as the center, though. Those long picots are always in the way!

Now, on another note, a few weeks ago, Jane Eborall tatted a(n?) opossum. (The o is silent so I am not sure if it is a or an.) She said something about not having seen one and I replied I had hit one that ran out in front of me. This morning, another one tried to commit suicide. I was able to stop in time so I did not hit it. You can see that in this 5 second video clip from my dash cam.


Wednesday, September 19, 2018

Christmas is Early

    Christmas already? Hardly. But at Tat Days my last class was called Leezil's Ornament. I do not know who Leezil is. It is a design by Erin Holloway Moseley. I really like taking her classes. She puts out chocolate. Lots of chocolate. And her classes are interesting and fun too. And CHOCOLATE.
    This was the class project, as I said, Leezil's Ornament. Pretty, isn't it. This the the first time I ever laced an ornament but it really wasn't hard at all. I got it fairly even, too. I did the "middle" round 3 times. The thread wasn't right. It felt like a zipper when I pulled it through and I kept finding places where some of the plies were cut. I finally pulled another ball from my drawer and had no further problems.
    I wish the photo was better. I still don't really like cameras in cell phones, but I could not get to my DSLR and it would not work on a scanner, so this what I got. I hung this over my monitor and turned off the screen. The flash caused too much reflection even though I set the sensitivity down. Oh, well. It will do for now.

Thursday, September 13, 2018

Another Picture of the Broomstick Teapot

    I am off today, waiting for the storm this evening, so I am playing with getting better photos. I think I may have hit on the solution. One thing that really bothers me is finding a way to get the reflections of the light off the photo so the stitches show more clearly. The photo below has accomplished that. I had gone to WalMart and found some 9x12 (I think) sheets of black felt. I put the teapot on my scanner and covered it with the black felt because the lid is white inside. This is how it looks after the scan.
    I think this is the way to go. It is clearer than using my phone camera and no reflections to deal with. I do need to clean off the lint specks, though.
    Now that I have that sorted, I am going to try to figure out how to use the GR-8 shuttle I bought at Tat Days and try to finish my last project.

Wednesday, September 12, 2018

Tat Days 3

    I wanted to get this posted before the storm arrives tomorrow. I will probably be out of power for a few days, but I do have a generator. If the phone goes out, though, I will have almost no internet, just what I can get on the phone. If you have not heard, I live in Florence, SC and Hurricane Florence is coming in tomorrow. It has our name on it.

    My third of 4 classes was with the wonderful Martha Ess. She has more design talent in her little finger than I do all over. The photo is the teapot she designed that was taught at the class. She calls it a Broomstick Teapot. If you look at the center, the long picots resemble broomstick crochet. I think this came out well.It is about 3 inches or so across in size 20. I intend to try it in the King Tut thread, but it may be a while. I have one more project from a Tat Days class to finish, then some miscellaneous things.

Tuesday, September 11, 2018

Tat Days 2

     When choosing classes for Tat Days I like to try to find something with a bit of a challenge to it so I look over the schedule and choose those first. Then I will find something to fill the empty slots if I can. I often will do a class because I like the teacher. I like Sharren Morgan. She is such a nice person to talk to, soft spoken and very easy to get along with. This year she was doing a class called Myrtle the Turtle. I jumped on it. Now, the objective of the class was to get the hang of Catherine Wheel Joins (CWJ). I have only made a few hundred of these lately but the class was interesting anyway. Actually, I ended up helping a couple other tatters learn the join the easy way.
    Anyway, I made the turtle pretty handily out of size 20 thread. That evening was the auction. During the auction (yes I did bid and make a purchase) I decided to tat another turtle. I did it in King Tut thread this time. (I am told that is about a size 130.) In the photo you can see the result. Yes, I did the CWJ joins, just as in the larger one. I don't think it looks too bad at all, even if the tail did get a bit loose.

Sunday, September 9, 2018

Depressed

    I am now in depression. Why? I just got back from Tat Days. Well that should have you pretty well on the up and up. No, I had to leave the company of a lot of great friends and acquaintances. The biggest thrill about Tat Days is really not the thread work, it is the people you meet and talk and tat with. Sure, the classes are great. I learned some good technique, made some nice things, saw other nice things. But the people are the main event. For instance, where else would I have ever met Randy Houtz? Or Georgia Seitz? Or Jane Eborall? (OK, Jane was not here this time, but I met her at Tat Days) Or any of the many other people that are so wonderful to spend time with. I would only meet them at Tat Days, probably. So now I am home and already missing everyone. Let me say thanks to all of you I did get to meet and talk with. You made my Tat Days.

    Now, about the classes. I took 4 classes. The first one was Randy Houtz's alternating thread technique. I already had the book, but was not quite getting the idea. Randy made it easy. He explained in good detail and did not mind questions at all. I totally enjoyed that. We did not have a "project" to do because it was a technique class, but I did make a bit of a sampler. Once I did this little bit, the idea presented itself and now I am fairly confident that I understand his method.
     Now, I said that was my first class, but there was another short class for early birds. It was a technique class also, taught by Mary Anna Robinson.We made a leaf using thread bars. Interesting idea and it looked good. Thanks Mary Anna.
    More on Tat Days in a day or so. Stay tuned!

Wednesday, August 29, 2018

Repairs

    One thing I will say, this doily has been an adventure. I am now working round 12, the penultimate round, and I was working away yesterday when i noticed one place kept bunching up. I laid out the doily on the table and saw that I had missed one entire repeat of the pattern and that the attachment points on round 11 were laying bare and loose. I don't really want to un-tat that much work, so the first thing I did was snip it apart at that location.
    Now I have it apart, I pulled loose the left side ring and chain, leaving enough thread to tie and sew up. I wound a couple more shuttles with a few yards of thread and attached, then re-tatted the repeat that should have been there all along. For some reason, the ring on the right had no inclination to undo ( I did pull on it in different directions several times to test it), so I simply worked to it and attached. I may put a spot of Fray Check on it later.
    I think it came out pretty well. You have to look closely to see where I added it back in. Now on with the rest of the round. I would like to finish this round before going to Tat Days next week.

Wednesday, August 22, 2018

Round 11 Done

    Finally found a little time to get something done. When I have a chance I have been working round 11 of Renulek's Spring Napkin. At lunch today I was able to finish round 11. This has been a long one. 48 motifs to repeat. They are not hard and only take about 20 minutes to do one, but getting time lately has been hard. It does need a little shaping, but nothing drastic. It is laying pretty well. I think the last 2 rounds will help with that.

    On to round 12. It should go pretty quickly.

Friday, August 17, 2018

SCMR Earrings

    It has been a while. The last few weeks have been really busy for me for some reason. Seems there has been non-stop something coming up that needs doing, so I really have not done a lot of tatting.
    Last month, at the Palmetto Tatters Guild meeting, we made earrings designed by Shawna Wachs. These are cute and I have already passed them to a friend. She wears them. They are really good practice for working with SCMR's, though. The entire thing is done in chains. I had never seen beads with 2 holes in the same direction, but that is how these work. You make the chain as SCMR, then pass the loop through the bead and close it. That makes only half the "ring", but you go around and do the other side too. You can make these in under an hour. I will find out if I am allowed to pass the pattern or not. I do respect copyrights.

    Tomorrow is the next meeting of the guild. We will be putting together things for Tat Days. It should be a fun day with lots of chatting and fellowship as we work. I am looking forward to it. Then, in just a couple more weeks, TAT DAYS! Yeah, I do tend to get excited.

Wednesday, July 11, 2018

Distracted Tatting

    I am sure all of you are aware of the subject of distracted driving. Using a cell phone, gawking at something other than what you should be looking at, eating a Whopper, can all cause you to have an accident, sometimes with a really bad outcome. I found out the other day that distractions can have other consequences too.
    I was working on the shown area of Renulek's Spring Napkin, still on round 11, and something else got me distracted. I think someone came in and started talking to me. (I was at work. I go in early and tat for an hour before time to start. It helps the day get off right.) I kept tatting since I have this round in memory now. Then I got half done with the ring I have marked 1. I need to join. Wait. I don't see the ring I have marked 2. OOPS! I had forgotten to do the previous ring and ch6, jumping right into the part that is on top,(the onion ring and topknot).
 

    This is a long way through the pattern. I am 2 1/2 rings and 3 chains ahead of myself. So now what? This is size 100 thread! I considered cutting it off and re-attaching, but I really did not want to do the tails. What I did was undo all of it. It took about an hour. (There goes lunch). But after I did, and re-tatted it correctly, I am glad I did. All because of getting distracted. Next time someone walks in you can be sure I will just lay it aside for the moment. Lesson learned!

Monday, July 2, 2018

One Round Robin Completed

    I like this thread a lot. It grows on you. I showed you Saturday that I was starting the finish round. Now I have it done. I think the Catherine Wheel joins look good and give a smoother appearance.Of course, some people like a more in and out type of finish. That's preference, really. I should take some time to try to make it circular, but probably won't. I have too many irons in the fire. I have a couple other round robin pieces to finish, some things the guild needs (Palmetto Tatters Guild), and the TAT program I am working.
Then too, Tat Days is only 2 months away. I am already excited to go. So, on to the next task.
Oh, by the way, it is 4-1/2" across. Pretty dense.

Saturday, June 30, 2018

More Round Robin

    I did finally finish my round on this doily. Now I am putting on a "finish coat" to it. For this doily, I had to create the last round. I left picots to attach to because the agreement was a last round could be added by the person who began this doily if so desired. A couple of them pronounced it finished. I want to end it off smoothly so I am adding a chain round. At each picot, then, I make a Catherine Wheel Join. This gives the smooth, undimpled look to the chain. After I am through, since the core thread will slide through a CWJ, I can adjust the tension around to make it even.
 
    I used this thread (King Tut Rosetta Stone) because I think it looks like granite, or some similar stone. Don't you?

Friday, June 15, 2018

I Passed The Artisan Level

    Some of you know I have been working the TAT program. That is Tatters Across Time. You can find it here. I have had the Apprentice level for a couple of years and as soon as I got that one, I sent for the next part, the Artisan level. I tatted up the items required, but I sat on it and sat on it, needing to finish the last part by tatting 2 rings. I just did not do it. I don't know why.
    Finally, about the end of February or so, I did tat the rings and submitted the projects. (I was spurred by another friend sending hers in.) Now to wait. It takes a couple of months because they mail the submittal to each of three "graders" for evaluation. I got a notice that it would possibly take a little longer for this one, but not because of anything I had done. Well, life happens, so fine.


    Yesterday, I received my materials back in the mail and enclosed was the Artisan pin. It also has the evaluations from each person. Yes, I did go through the evaluations. One of the purposes is to get better. If you read constructive criticism, you will learn to make your work better. I appreciate every comment. The big surprise, though, was one piece that I really did not think was that good was liked by everyone! I guess I need to stop pre-judging myself.
    Sorry, but I cannot post pictures of the items in the project. The organization specifically request that you do not in order to maintain the integrity of the program and not give someone an unfair advantage. I agree with that idea and will go along with it.

Sunday, June 3, 2018

A Round Robin and the Deck About Done

    I think I have mentioned that I am in a round robin on Craftree. It is my first attempt at designing anything and I am really finding that design is not an easy process. It takes imagination and vision. I work in technical graphics and use math and dimensions, but I don't have to come up with the original design. This is one of the doilies in the round robin. I am working on the round just before my turn to add something. I am using King Tut thread, color #978,  Rosetta Stone. I think this will look good next to a granite object like a bowl.


    You may remember a couple posts ago that I am working on replacing the floor on my deck behind the house. I am almost done. I got all the floor installed and the tails of the boards cut even today. It has been a project. I have just a little trim to do and it is over. The trim is really minor. I will get that when I get a chance. No rush. I don't do heat very well and it is now in the 90's outside. Summer is here.
    Here is a shot from my drone of the deck. Pay no attention to the troll on the left.

Tuesday, May 15, 2018

Round 10 Done

    Well, well. I finally got through with round 10 of Renulek's 2018 Spring Napkin. I just have too much going on. This was a long round and it looks like round 11 will be longer. I did remember to check the position of the ring with 5 attachments, though, and I did get them all correct. The doily is now about 9 inches across. I am, if you recall, doing it in DMC size 100. I wish I could get a better photo, but the office lights reflect too much so I have to angle it to be able to see the doily. I still have no blocking needed. Perhaps a light pressing when I finish it. It lays pretty well as is.

    Time to start work now, so I will start round 11 at lunch. Maybe. If I have a moment free.

Monday, May 14, 2018

Metallic - A Bit Different

     Handy Hands has released their metallic thread. I see a lot of people online trying it out and working with it. I have to confess, I have not bought any yet. I am still trying to "like" working metallic threads. I do have some. I think I have 3 brands. Coats, DMC and something else on a mini-spool that I don't remember. I think I got the last one at Tat Days. It's not Kreinik. Brandi (the girl at work that I tat with) did buy some. I tried a bit of hers. It works fine, but there is a texture thing going on with me no matter what brand I use. It just feels funny. I am used to a nice, smooth cotton thread. The metallic threads almost make my fingerprints itch. It feels a little "sticky".

    I did this piece with DMC metallic thread. I don't see a size on the spool, but it is probably something about like a 100 size. I think I found it at JoAnns. This is the center of the Amusement Doily, but only 8 repeats instead of 10. The metallic thread looks more yellow than gold and it does not glitter like metal in the photo. I think this medallion would look at home on a kimono or some such dress. The background is not denim. It is the blue goodie bag from last year's Tat Days.

Monday, April 23, 2018

Trying To Kill Myself

    I know. I haven't posted for a while. But I have been trying to kill myself. First, though, I did some tatting today while I had the wife at the hospital for her checkup today. We use the Walmart grocery pickup, so in gratitude for the assistance from the girls (women) working there, (some are only 19 or 20. To an old fart like me they are girls.), I have been making earrings. Again. They just like them. These are yellow with black beads, as requested.


    As to the topic of the post, the wife likes to make suggestions when spring pops 'round. She suggested I repair our deck on the back of the house. So I bought lumber. Enough to redo the entire floor of the deck. Now the deck IS over 30 years old, so the wood is in really bad shape. Rough and rutted. I am almost 65 and have not worked construction for 25 years. I have to pry out the old boards with a big crowbar, then screw down the new ones. In between I cut and fit the boards around posts and the like. Each day in the weekend I do this, I replace about 12 boards and I am through. I physically cannot take it any more. I have thus come to the conclusion that getting old sucks. If you look at the pictures, though, I think you will agree it looks better.

I will do handrails later this summer. I still have about half the deck to go, so I am not going to be tatting a lot for a while. Too tired!

Wednesday, April 11, 2018

Pay Attention, Will you?

    Pay attention, will you? That is what I told myself this morning after I made a discovery. I had a small, but significant error. Can you spot it? I am just over 1/2 way around round 10. It's going pretty good, but I got distracted this morning and this is what happened.
    I cut back to the previous motif on the round. I cut out or dismembered 5 rings and a lot of the chains. After the last ring was cut, I pulled the core thread out of the chains so I would have something to work with. I sewed those ends in, passed the threads from the shuttles through the last ring and tatted over tails until I was satisfied it would not pull loose. Now continuing with the round. To see the error you will have to look for it, but at a glance, you won't see it. So, see! I'm not perfect.

Monday, March 26, 2018

Renulek's Spring Napkin Round 9 Done

This is a simple round. At least you think so when you start it. But you find out quickly that it will be a challenge. No, it is not difficult. It is all rings and chains, nothing fancy. But the other day I was reading Jane McLellan's blog (here) and of course, she was right when she was saying the elements are not connected.That is the problem. When you reverse work, your thread tends to wrap around the loose elements in this round. One other thing to watch. As you reverse work from the clover, be sure the chain does not get twisted. I had to backtrack a few stitches two separate times to fix that.


So, yes the round is simple. But it's not.

Saturday, March 17, 2018

Round 8 Done and Good News

    I now have round 8 of Renulek's Spring Napkin done. Working on it has been hit and miss because we have a big push at work to get out the new version of our software. Since I am a tester and I do support, I have had to work 12 hour days again just to keep up. I worked on round 8 when I could, for instance, at lunch. Of course, I take an hour and someone else will take 1/2 hour and I have to stop.

    I did cut and tie this round. The next couple rounds really do not lend themselves to continuous tatting. It is not that I could not find a path, though round 10 would really be a challenge. Mostly it  was time cut and tie vs. continuous tatting time. It just made more sense to do it the easier way this time. Now to start round 9.

In other news, the good news in the title is that, if you remember late fall of 2016 we had a hurricane and it left a large tree in my back yard with a really massive stump and trunk. I was finally able to hire a service to get it out of the yard and grind the stump down. Now all that is left is moving the rest of the stuff in the old shed to the new one and dismantling the old shed down to the floor. I think the floor is ok. If it is, I am just going to rebuild it. Then I will have 2 sheds. One will become my radio shack for my ham radio stuff. I can't wait!

Thursday, March 1, 2018

On To Round 8

    I am still working on Renulek's Spring Napkin. I have finished round 7 and segued to round 8.

To do this, I used a split chain on the last ring, then a split ring. This took me to the other two leaves of a clover. One is right and one is left. In her pattern, she does tie and cut, then starts with one of the "outer" leaves, makes the big ring attached to round 7, then the other "outer" leaf. From there it is a chain.
    Looking at where I was, I already have the Ring attached to round 7, so how do I make the two "outer" leaves without it looking lopsided? Then it hit me. I have two shuttles. I made one of them with each shuttle. This came together at the center and I continued on with the chain.

    I think I made the balance just right. It looks even and the chain comes out of it nicely. Now I continue with the pattern as written.

Sunday, February 25, 2018

Working With Split Rings

    A friend said they are having a little trouble with split rings, so I made a couple of short videos to show them how to get around the problem. First up is just how I make a picot on the "split" part of the ring. I call the part of the split ring that is closest to me the split part. You make the stitches as RODS, of course. 


 The other problem they were having was how to attach the split ring to a picot on another element. It is a little tricky until you understand that the core thread has to remain the core thread. This video shows how it works.


    I hope these help explain this to those who have not yet "gotten it".

Friday, February 23, 2018

Return of the Duchess

She is back! For a limited engagement, she has returned. This is, for some reason, one of my favorite little tats. I like making it. It is Jane Eborall's 2017 TIAS pattern. It does not take long and it has a variety of stitches. I have done her in a variety of threads, too. I have used not only several colors, but also several sizes. This one is the latest. The colors are 997 Alabaster and 991 Sahara Shadows. This is in King Tut quilting thread. The Duchess, as I call her, is not as big as the shuttle I used!


As I said a couple of posts earlier, I kept hearing about this thread. Now I find I do like to tat with it. It pulls through a ring very easily. It has little twist coming off the spool. I will probably be doing quite a bit with it in the future.

Friday, February 16, 2018

Delivered! Finally.

    If you have looked at this blog for a year or so you may remember I made a top hat in May of 2017. I did it because there is a tea house here called Top Hat. I was there and the owner had crochet hangings but no tatting, so I decided to make some tatting for her. That is why I made the hat. One of the ladies at work is good with ribbon so she made the hat band for it.


    Today, the hat was delivered. Four of us, Lois, Brandi, Ava and I went to lunch. When we had finished we called the owner over and gave her the hat. She loved it! Now she wants to buy my lunch. I did not do it for that. I just wanted to get some tatting out in the public eye. I was pleased that she did like it, though.

Wednesday, February 14, 2018

Thread For A Tryout

    I keep seeing and hearing about this one brand of thread, King Tut, by Superior Threads. Since it seems several people are enamored of it, I decided to order some and test it myself. I have not quite decided what to do with it, but I do have an idea. I ordered 5 spools of 500 yards. I figured that a few colors would not be a bad thing and would let me see how it runs in the color variants.
    When I went to the Superior Threads website, I chose King Tut and was amazed at the colors. There are 135 colors. The first 100 make up the "Egyptian" theme colors. That is inventive, to say the least. One color I have little of is browns. I got Alabaster, Cedars, Sahara Shadows, Sahara Desert, and Sphinx. From creams to browns. This should be a good mix.

What am I going to do with it? I am not sure, but I did just sign on for a round robin on Craftree, so I may just use it for that. I have tried a few rings and chains already. It seems to tat well, pull smoothly and it is strong. I will tell more after I give it a proper workout. Oh, by the way, you can also get the first 100 colors as a set for about $800. Order one for me too. Thanks.

Saturday, February 10, 2018

Trying Something New

    I am trying out something new today. No, not tatting. I found my cam and thought about making a short clip. I decided that since I just put a new tablecloth on that old table I sit at, maybe I would not be so ashamed to try video, so here we are. Yes, it has sound. Please excuse the heavy breathing. I was almost on top of the cam and it has a built in microphone.
    I restarted the Spring Napkin. I am up to round 3, not far from done. Round 3 has thrown rings. One thing I hate is when I get a thrown ring that has a gap between the ring and the chain. This short video shows what I do to eliminate that problem. Actually, I do this almost everywhere. I am not, by the way, doing front side - back side tatting, though I have.


I think for a first try that the video came out ok. I probably should have a script because I was hesitating a lot. I even almost forgot the word "chain". I also spotted an error. I put the second half stitch under the ring, said don't count it, and started counting at 2. Oops! I am not going to go back and add one stitch.

Friday, February 9, 2018

Tear It Out

    AAAggghhh! I have to tear it out. I counted back and found where I missed something. On round 5 there are 24 connections. I only counted 23. I looked closer and there is a missed connection. That causes the count to be off. The solution? Tear it out or do it all over. I am going to tear it out first and see if I can just make the correction and move on. If it becomes too cumbersome, I will just start over. Let me see where it goes. (That's just tatting!)

    The bad news, I clipped a picot. That's it. Redo. Won't be that much and I don't want it to look pieced together. I should just wait for the new thread I have coming, but I won't. I have enough of this to do the doily.
    The good news is the epidural seems to have worked so far. I got it Tuesday. This is Friday. No pills. No pain. Hope it holds.

Wednesday, February 7, 2018

I Was Uncle Festered

    Its been an interesting few weeks lately. I really don't think I talk too much about my life outside of tatting, maybe I do, I don't know. But I have been dealing with sciatica for a while now. It started the 19th of December and really got bad. I finally got to a doctor. He put me on painkillers until I could see a neurosurgeon. Then I have had to do physical therapy for a few weeks. Finally, yesterday, I was Uncle Festered. You don't have any idea, do you? You remember the Addams Family probably. The old TV show. One of Uncle Fester's lines was "Shoot him in the back!" Well, yesterday they did that to me. The doc gave me a version of an  epidural. She (yes, she) put some kind of concoction into my back but did not penetrate the spinal cord, like a spinal tap would. The objective, in my understanding, is that it should make the bulging disc shrink back down off the sciatic nerve and numb that nerve for a while. I get to see the surgeon again in a few weeks. Hopefully it will do what he wants and I won't need surgery.

    Meanwhile, I have been tatting. I now have round 6 of the Spring Napkin done. I will start round 7 tonight. It should be interesting. I am climbing out of every round. This one comes into a sort of butterfly arrangement so I have to figure the path to develop it and be able to proceed with the rest of the round. I  think I already have it. Probably not as hard as it looks at first. I just have to try.

Sunday, February 4, 2018

The Spring Napkin Round 4

    I managed to finish round 4 yesterday. It's a good thing I had the day off. Round 4 ended in a similar manner as round 3. That is, split chain, split ring, start round 5 with split ring. I like this doily. It will be a nice break from making horses for my carousel.
    I was afraid that the size 100 was going to be hard to work, but after round 3, I see that it is not. It is not a lot smaller than size 80. That is a good thing because I spent a good part of round 3 untatting. There are 2 different rings on round 3 and I kept getting them confused. I would catch myself after about 4 stitches, which meant take out 2 stitches and add a picot, or take out 2 stitches and remove the picot. I finally got it right. Undoing a few stitches was not particularly difficult.
    Another thing I had to manage was when I started a ring or chain. Getting the first stitch to snug up to the previous element was sometimes a minor challenge. Of course, if it left a gap, I took that out and fixed it. The real fix, for me at least, is to start that part with a 2nd half stitch. Take for instance, at a thrown ring. I stop the chain, loop the 2nd shuttle thread to make the ring, and the first thing I do is make a 2nd half stitch. I do not count it. I make my ring, then change shuttles to continue the chain and make a 2nd half stitch, then finish the chain. For some reason this keeps things tight, no gaps. I don't think the extra half stitch affects the count.

    Round 4 is done. Round 5 should go pretty fast.

Saturday, February 3, 2018

Renulek's Spring Napkin

    After replies about working in small thread I took a look around Handy Hands and found some DMC in size 100. I ordered 2 in white and 2 in ecru. I like those for really involved patterns and they always go with any color scheme anywhere. I wound a couple of shuttles, CTM, then put the amount on the CTM thread chart I am doing. I can get 30 yards of size 100 DMC on an Aero bobbin.
     Next, the pattern. Not being artistic enough to invent one of my own, I started looking around. I thought about some of the old patterns from the turn of the century. I thumbed through the Priscilla books, Julia Sanders, and others. Then it struck me to see if maybe Renulek has a new spring napkin out. It turns out she does. Now I am told she posts a round at a time on her blog, but being impatient, and needing to know what the next round is, I bought the pattern pdf. It is only $7 and well worth the money when you think about what has to go into creating one of these.
    So now I am set. I am working on round 4 as I type this (February 3). The reason I wanted the complete pattern is that I like to work continuous method when I can. I think it makes you pay a bit more attention. The shift from round 1 to 2 was only a split chain, and from 2 to 3 was the same, but 3 to 4 was a 10 stitch split chain with a picot in it, 5-5, then the offset split ring that was a thrown ring everywhere else, then  a split ring to start round 4. Easy peasy thanks once again to Marie Smith. If you don't know what that means, look here and get the Fast and Easy pdf.

Round 2 done
Round 3 split chain
Round 3 split ring added


Round 3 finished